DSM 7.1 Setup: Configuring the Web GUI to Use HTTPS
Synology NAS devices have become an essential tool for businesses and individuals looking to centralize, secure, and efficiently manage their data. The DiskStation Manager (DSM) operating system, which powers Synology NAS devices, has evolved significantly over the years.
With the release of DSM 7.1, setup web gui to https users have access to a suite of robust tools and enhanced security features, including the ability to secure the Web GUI with HTTPS. Configuring HTTPS for your DSM Web GUI is crucial for ensuring secure communication between your browser and the NAS.
In this guide, we’ll walk you through the step-by-step process to set up HTTPS for your DSM 7.1 Web GUI, ensuring a secure and reliable connection.
Why Secure the DSM Web GUI with HTTPS?
Before diving into the setup, it’s important to understand the benefits of securing the DSM Web GUI with HTTPS:
- Data Encryption: HTTPS encrypts the data exchanged between your browser and the NAS, preventing unauthorized access to sensitive information.
- Authentication: HTTPS uses SSL/TLS certificates to verify the identity of the server, ensuring you’re connecting to the correct device.
- Compliance: For businesses, using HTTPS can help meet regulatory and compliance standards for data security.
- Browser Trust: Modern browsers warn users about insecure connections. Configuring HTTPS eliminates these warnings and builds trust with users.
Prerequisites for Configuring HTTPS
Before setting up HTTPS on DSM 7.1, ensure the following:
- A Synology NAS running DSM 7.1: Ensure your system is updated to the latest version of DSM.
- Administrator Access: You need admin privileges to configure HTTPS.
- Domain Name (Optional): While DSM allows using a Synology-provided domain, having a custom domain enhances flexibility.
- SSL Certificate: A valid SSL/TLS certificate is required. You can use Synology’s free Let’s Encrypt certificate or import a third-party certificate.
Step-by-Step Guide to Setting Up HTTPS
Follow these steps to configure HTTPS for your DSM 7.1 Web GUI:
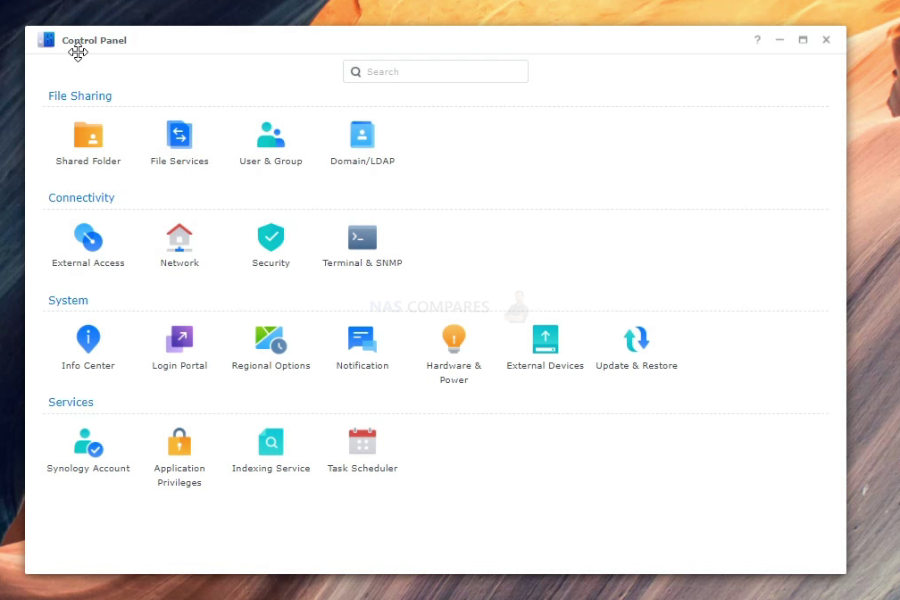
1. Access the DSM Control Panel
- Log in to your Synology NAS with an admin account.
- Open the Control Panel from the main menu.
- Navigate to Connectivity > Security > Certificate.
2. Obtain an SSL/TLS Certificate
DSM offers multiple options for obtaining a certificate:
Option A: Use Let’s Encrypt (Free)
- Click Add Certificate.
- Select “Get a certificate from Let’s Encrypt” and click Next.
- Enter your domain name (e.g., yourdomain.synology.me), email address, and any additional Subject Alternative Names (SANs).
- Click Apply. DSM will automatically request and install the certificate.
Option B: Import a Third-Party Certificate
- Obtain a certificate file from a trusted Certificate Authority (CA).
- Click Add Certificate.
- Select “Import certificate” and click Next.
- Upload the certificate file, private key, and intermediate certificates.
- Click Apply to complete the process.
3. Assign the Certificate to the Web GUI
- In the Certificate panel, locate the certificate you just installed.
- Click Configure.
- Assign the certificate to the DSM Web GUI service.
- Click OK to save your settings.
4. Enable HTTPS in DSM Settings
- Navigate to Connectivity > Login Portal in the Control Panel.
- Select the DSM tab and click Edit.
- Under the “Web Service” section, check the box for “Automatically redirect HTTP connections to HTTPS”.
- Save your changes.
5. Test the HTTPS Connection
- Open a browser and navigate to your NAS using the HTTPS protocol, e.g., https://yourdomain.synology.me.
- Verify the browser shows a secure connection (indicated by a padlock icon).
Additional Considerations
Using a Custom Domain Name
If you have a custom domain, you can link it to your NAS using Synology’s DDNS service or a third-party DNS provider. To set this up:
- Go to Connectivity > External Access > DDNS in the Control Panel.
- Add a DDNS provider and configure your domain name.
- Ensure your domain’s DNS settings point to your NAS’s public IP address.
Renewing the SSL Certificate
Let’s Encrypt certificates are valid for 90 days and are automatically renewed by DSM. If you’re using a third-party certificate, ensure you renew it before expiration and update it in DSM.
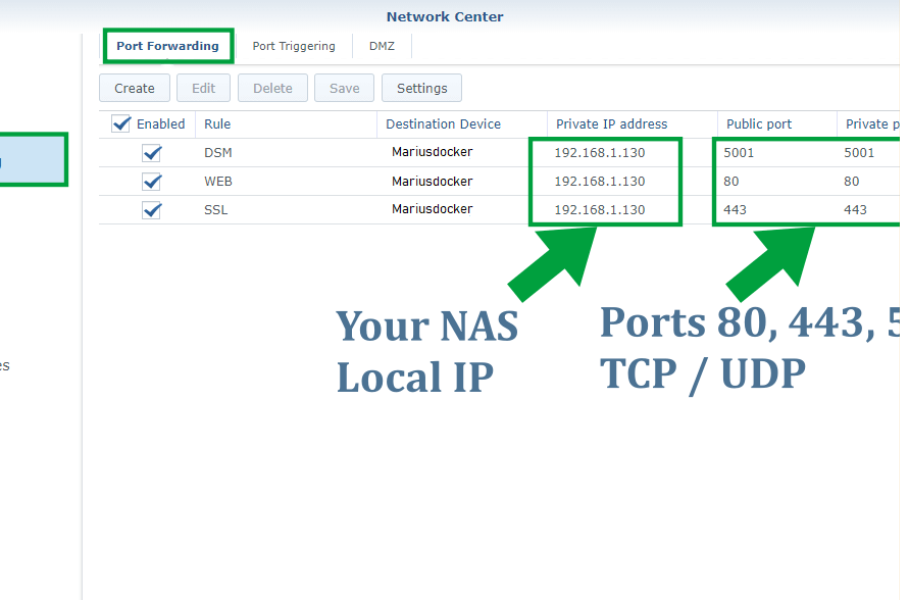
Firewall and Port Forwarding
For external access, ensure the appropriate ports are forwarded on your router:
- Port 5001: Default port for HTTPS access to DSM.
Configure your NAS firewall to allow HTTPS traffic while blocking unauthorized connections.
Troubleshooting Common Issues
- Certificate Errors: If your browser shows a certificate error, ensure the domain name matches the certificate and the certificate is not expired.
- Connection Issues: Check your router and firewall settings to ensure port 5001 is open.
- DDNS Problems: Verify your DDNS configuration and domain DNS records.
Conclusion
Securing your DSM 7.1 setup Web GUI with HTTPS is a critical step in protecting your data and ensuring secure access to your Synology NAS. By following this guide, you’ll benefit from encrypted connections, enhanced privacy, and compliance with modern security standards. Whether you’re using a free Let’s Encrypt certificate or a custom third-party solution, the process is straightforward and well-supported in DSM 7.1.
Unlock the latest insights and trends in app development at theappkod.